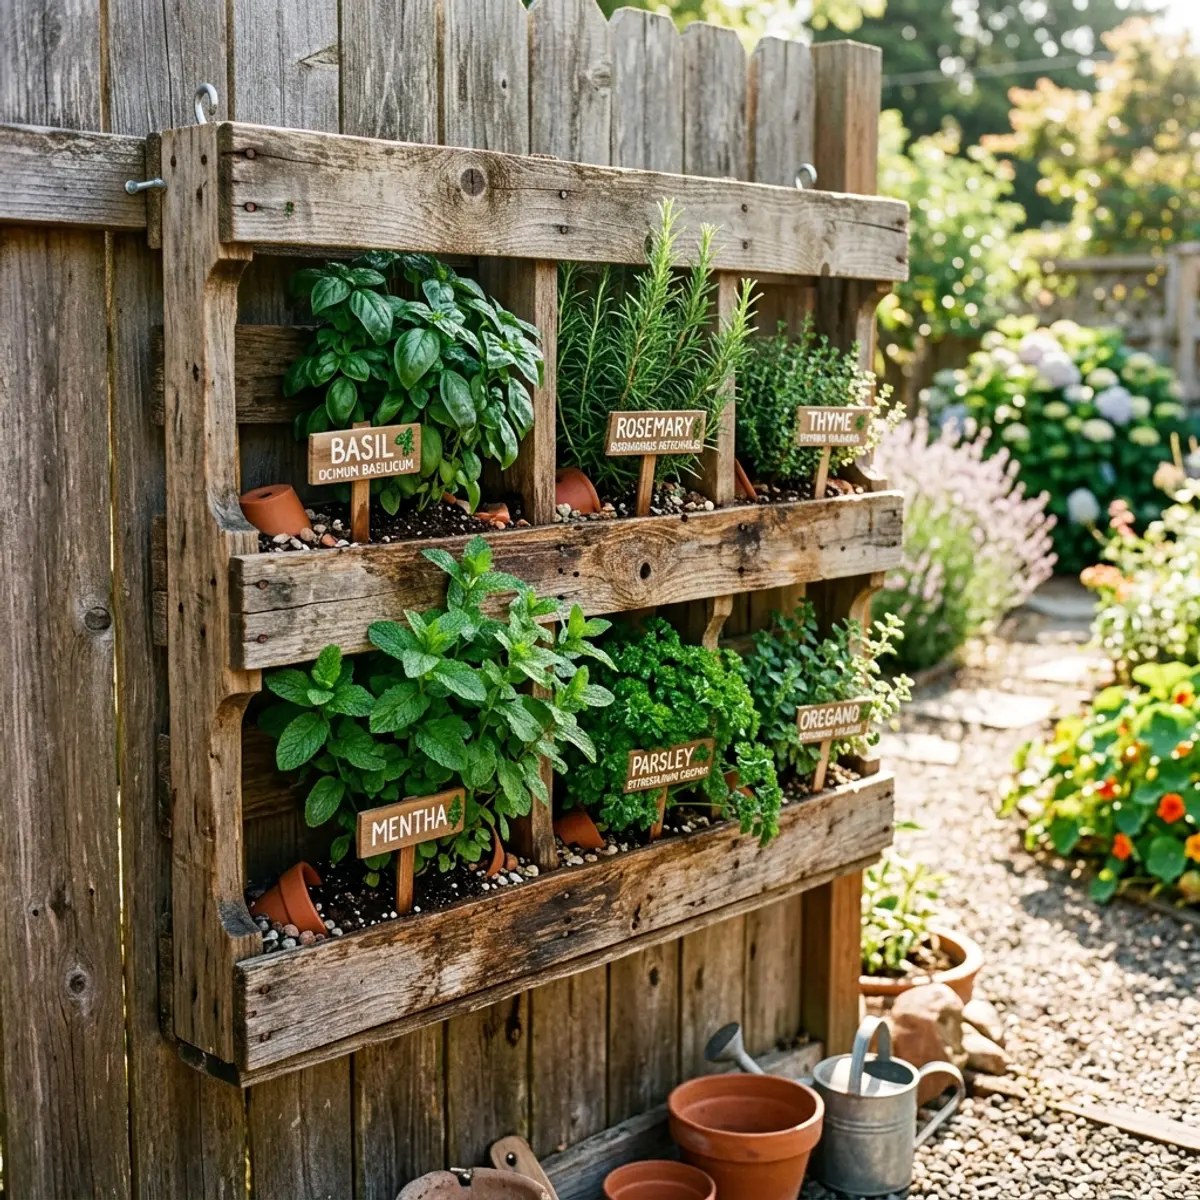
Wooden Pallet Herb Garden with Labeled Sections
Nail It Home Editorial
Fresh herbs from your own garden taste incomparably better than anything from a plastic supermarket pack — and growing them doesn’t require a large plot, a big budget, or even much gardening experience. All you need is a single wooden pallet, a bag of potting soil, and a free afternoon.
A pallet herb garden is one of the most rewarding DIY outdoor projects you can complete in a day. The slatted design naturally divides your garden into sections, making it perfect for organizing different herb varieties — and when each section gets its own handmade label, the whole thing looks like something straight out of a professional kitchen garden. Whether you lean it against a fence, mount it on a wall, or lay it flat on a balcony, a pallet herb garden brings life, fragrance, and fresh ingredients right to your door.
In this guide, you’ll learn how to select the right pallet, prep it properly, plant it up with the best culinary herbs, and craft beautiful labeled markers that make every section easy to identify at a glance.
Why a Pallet Herb Garden Is One of the Best Outdoor DIY Projects
Before you grab your gardening gloves, here’s why this project consistently tops beginner DIY lists:
- Practically free materials: Pallets are often available for nothing — from hardware stores, supermarkets, garden centres, and Facebook Marketplace. The entire project can cost under $20 if you already have basic tools.
- Perfect for small spaces: A single pallet measuring roughly 48×40 inches gives you 6–8 planting sections in a fraction of the footprint of a traditional garden bed.
- Built-in organisation: The slats create natural dividers between herb varieties, so your basil never invades your thyme.
- Flexible placement: Lay it flat as a ground-level bed, lean it at an angle against a fence, or mount it fully vertical on a wall — the same pallet works in all three configurations.
- Beginner-friendly plants: Culinary herbs are among the most forgiving plants you can grow. Most are drought-tolerant, fast-growing, and highly productive even for first-time gardeners.
- Instantly beautiful: A finished pallet garden with lush green herbs and hand-lettered labels looks like a designed feature, not a DIY project.
What You’ll Need — Supplies and Tools
Collect everything before you start. A well-stocked workspace means you can move from step to step without interruption.
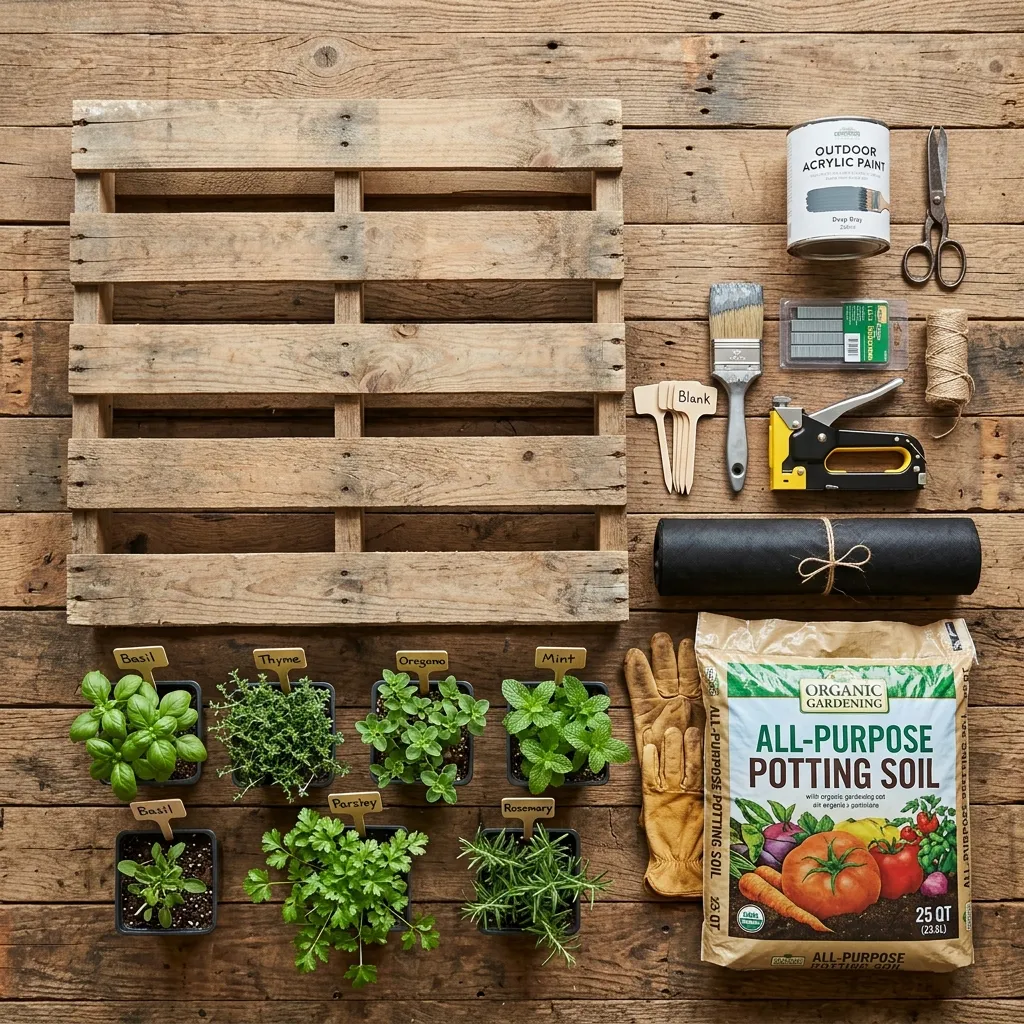
The Pallet
- One heat-treated (HT) wooden pallet. This is the most important material choice — only ever use pallets stamped HT (heat treated). Avoid pallets marked MB (methyl bromide treated), which use a chemical fumigant that is toxic to plants and humans. The stamp is usually on the side of the pallet.
- Size: A standard pallet is 48×40 inches — ideal for 6–8 herb sections. Smaller “half pallets” work well on balconies.
- Condition: Look for solid slats with no rot, no deep cracks, and no missing boards. A little weathering is fine and often looks better than a brand-new pallet.
Planting Supplies
- Landscape fabric (also called weed membrane): This lines the back and sides of the pallet, creating a pocket that holds soil between the slats. One roll covers one full pallet with plenty to spare.
- Staple gun + staples: Used to secure the landscape fabric. A manual staple gun works fine; an electric one is faster.
- High-quality potting compost: Regular garden soil compacts too easily in a vertical pallet — use a light, well-draining potting mix. You’ll need roughly one 40-litre bag per pallet.
- Herb seedlings or seeds: More on choosing herbs in the next section.
- Slow-release fertiliser granules (optional): Mix a handful into the compost before planting for a season-long nutrient boost.
Label-Making Supplies
- Wooden craft sticks, lollipop sticks, or thin offcuts of wood: These form the stakes for your labels.
- Outdoor paint or chalk paint: For painting the label backgrounds.
- A fine waterproof marker or paint pen: For writing herb names. Black on white is classic; metallic copper on dark wood looks stunning.
- Clear outdoor varnish or sealant: Protects the labels from rain and sun fading.
- Small drill bit (optional): If you’re making tag-style labels to tie onto the slats rather than push into the soil.
Estimated total cost: $20–45, depending on whether you source a free pallet and already own a staple gun and basic tools.
Step 1 — Choose and Inspect Your Pallet
Not every pallet is suitable for a food-growing project. Spending five minutes on selection now saves frustration later.
Where to find HT pallets:
- Garden centres and hardware stores often have stacks of used pallets they’ll give away free.
- Supermarket loading bays and warehouse stores regularly discard them.
- Facebook Marketplace and Craigslist consistently list free or near-free pallets — search “free pallet” in your area.
What to look for on the stamp: Every pallet that has been internationally traded must carry an IPPC stamp. Look for:
- HT = Heat Treated ✅ Safe for food growing
- KD = Kiln Dried ✅ Also safe
- DB = Debarked ✅ Safe
- MB = Methyl Bromide ❌ Never use for food gardens
Condition check:
- Press your thumb firmly into the wood at multiple points. Any soft, spongy spots indicate rot — move on to a different pallet.
- Check for protruding nails and hammer any raised heads flush before you begin.
- Look for missing slats. A full set of intact slats gives you the most planting sections.
Step 2 — Prepare and Line the Pallet
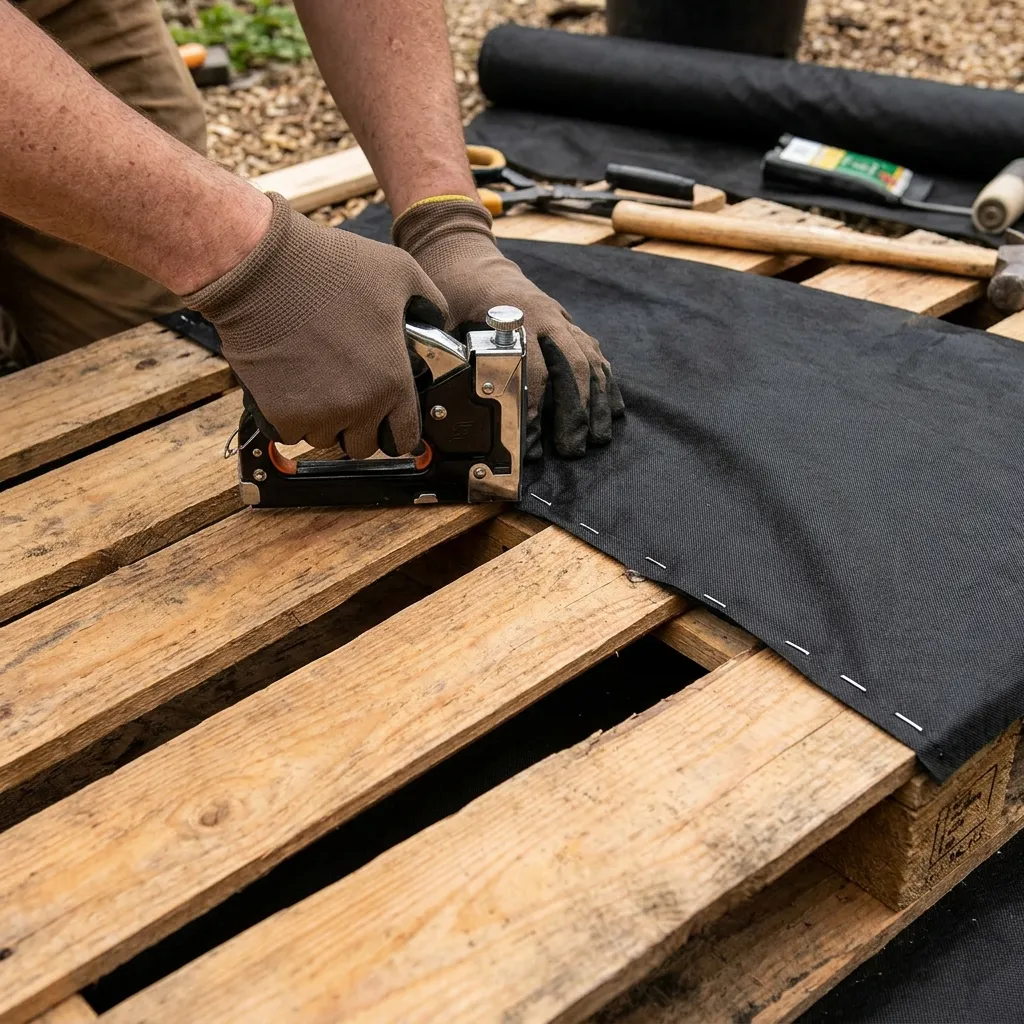
This is the step that transforms a pallet into a functioning planter. The goal is to create fabric-lined pockets between the slats that hold soil in place when the pallet is vertical.
Lining the Pallet
- Lay the pallet face-down on a flat surface. You’re working on the back and sides first.
- Cut landscape fabric to cover the entire back of the pallet plus wrap around all four sides, with an extra 4–6 inches of overlap on each edge. It’s better to cut too large and trim than to cut too small.
- Staple the fabric to the back of the pallet, working in rows from top to bottom. Space staples every 3–4 inches along each slat. Pull the fabric taut as you go — loose fabric will sag under the weight of wet soil.
- Fold the fabric around the sides and bottom and staple those down too. The top of the pallet (the open face with the slat gaps) is left open — this is where you’ll plant.
- Double-layer the bottom section. The base of the pallet takes the most weight, so fold an extra layer of fabric over the bottom few inches and staple it securely.
Filling with Soil
- Stand the pallet upright (leaned against a wall or held by a helper).
- Fill from the top, pouring compost into the gaps between each slat. Use a trowel to pack soil firmly into each section — you want it dense enough that it won’t pour out when you water.
- Work in sections, tamping the soil down with your trowel before adding more. Air pockets lead to uneven settling.
- Leave a 1-inch gap below each slat opening for planting — this gives root balls room to sit level with the slat.
Tip: If you plan to mount the pallet vertically on a wall, let it lie face-down (planting side down) for 2–3 weeks after planting before standing it up. This gives roots time to establish and grip the soil before gravity is added.
Step 3 — Choose Your Herbs
One of the joys of a labeled pallet garden is the ability to curate a purposeful herb collection. Here’s how to think about your selection.
Group by Water Needs
This is the most practical consideration when herbs share the same soil:
Mediterranean herbs (drought-tolerant, need less watering):
- Rosemary
- Thyme
- Oregano
- Sage
- Lavender
Moisture-loving herbs (need more regular watering):
- Basil
- Mint
- Parsley
- Coriander / Cilantro
- Chives
If possible, plant similar water-need herbs in adjacent sections, and keep mint in its own section — it’s a vigorous grower that will crowd its neighbours given the chance.
Best Choices for a Six-Section Pallet
For a classic culinary herb garden that covers most kitchen needs, try this lineup:
| Section | Herb | Why It Works |
|---|---|---|
| 1 | Basil | Fast-growing, productive, loves sun |
| 2 | Rosemary | Drought-hardy, perennial, beautiful |
| 3 | Thyme | Compact, low-maintenance, versatile |
| 4 | Mint | Vigorous — benefits from section containment |
| 5 | Parsley | Reliable and endlessly useful in the kitchen |
| 6 | Chives | Easy from seed, attractive flowers, perennial |
Starting from Seeds vs. Seedlings
- Seedlings are faster and more reliable for beginners. You’ll have harvestable herbs within 3–4 weeks.
- Seeds are cheaper — a single packet of basil seeds costs the same as one seedling and grows far more plants. Ideal if you have time to wait 4–6 weeks.
- A mix: Buy fast-growing herbs as seedlings (basil, parsley) and slow-growing perennials as seedlings too (rosemary, thyme) — they’re worth paying a little more for an established plant.
Step 4 — Plant Up Your Pallet
With the pallet lined, filled, and your herbs selected, planting itself takes only 20–30 minutes.
- Make planting holes in the soil of each section using your fingers or a small trowel. The hole should be just deep enough to accommodate each plant’s root ball.
- Ease the seedling out of its pot gently, teasing apart any circling roots at the base.
- Place the root ball into the hole so the plant’s base sits just above the slat level. Planting too deep can cause the stem to rot.
- Firm the soil around the root ball, removing any air pockets with your fingertips.
- Water each section thoroughly immediately after planting. For a vertical pallet, water slowly so it soaks in rather than running straight out.
- Add a pinch of slow-release fertiliser to each section if you haven’t already mixed it into the bulk compost.
Pro tip: If you’re planting in a vertical pallet, do the bottom sections first and work your way up. This way you won’t be reaching over freshly planted herbs and disturbing them as you work.
Step 5 — Make Your Herb Labels
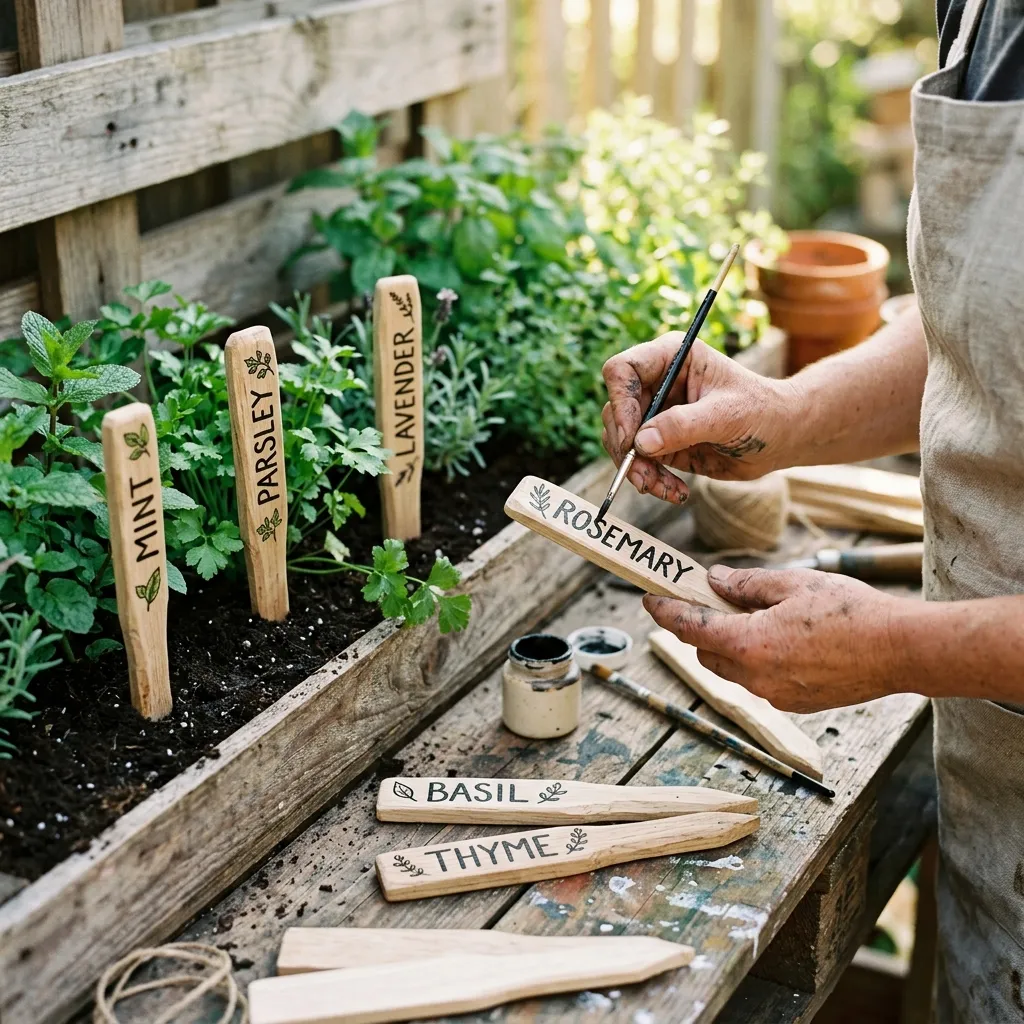
Labels are what elevate this project from a functional planter to a proper kitchen garden. They make harvesting easy, look beautiful in photos, and mean you’ll never again find yourself sniffing a sprig trying to tell rosemary from thyme.
Stick-Style Labels (Simplest)
- Cut wooden craft sticks or thin strips of wood (1×6 inches works well) into pointed stakes.
- Paint the flat top portion with white chalk paint or outdoor paint. Two coats for good coverage.
- Once dry, write the herb name using a waterproof black marker or paint pen. Cursive looks beautiful; neat block capitals are easier to read at a glance.
- Seal with a coat of clear outdoor varnish. This step is non-negotiable if you want the labels to survive rain and UV exposure.
- Push the pointed end firmly into the soil of each herb section.
Hanging Tag Labels (More Decorative)
- Cut small rectangles of thin wood (2×1 inches) or use pre-cut wooden craft tags from a hobby store.
- Paint, letter, and seal as above.
- Drill a small hole at the top of each tag.
- Thread twine through the hole and tie each tag to the corresponding slat just above its herb section.
Label Design Ideas
- Classic: White background, black lettering, lowercase script — timeless and works with any garden aesthetic.
- Botanical: Small painted herb illustration beneath the name — beautiful for a cottage garden look.
- Metallic: Dark-stained wood with copper or gold paint pen lettering — striking in a modern garden.
- Chalk: Use a chalkboard paint base and chalk marker, so labels are easy to update seasonally.
Step 6 — Mount or Position Your Pallet
Where and how you place the pallet affects both its appearance and how well your herbs grow.
Vertical Wall or Fence Mount
This is the most dramatic presentation and uses the least ground space.
- Choose a south- or west-facing wall for maximum sun exposure. Most culinary herbs need at least 6 hours of direct sunlight daily.
- Mount using heavy-duty hooks or brackets screwed into wall studs or masonry. The pallet will weigh significantly more once filled with wet soil — always anchor into solid structure, never just drywall.
- Leave a 2–3 inch gap between the pallet back and the wall. This airflow prevents moisture buildup and reduces the risk of mould on the wall surface.
Leaning Configuration
Lean the pallet at a 70–80 degree angle against a fence or wall. This is the simplest setup — no drilling required — and still looks beautiful.
- Use rubber feet or small wooden blocks under the bottom of the pallet to prevent moisture contact with the ground.
- Secure the top of the pallet loosely to the fence with a length of twine or a single cable tie, just enough to keep it from shifting in wind.
Flat Ground-Level Configuration
Lay the pallet flat and use it as a raised bed. This is the easiest configuration for watering and harvesting, and works especially well on patios and balconies.
- Elevate it on bricks or wooden blocks to improve drainage and airflow underneath.
- This configuration requires no fabric lining — the pallet base itself holds the soil.
Caring for Your Pallet Herb Garden

A well-planted pallet herb garden is remarkably low-maintenance. Follow these basics and your herbs will thrive all season.
Watering
- Vertical pallets dry out faster than flat beds because excess water drains quickly and wind increases evaporation. Check the soil daily in warm weather by pushing a finger 1 inch into the compost — water when it feels dry at that depth.
- Water slowly and deeply, especially for vertical configurations. A light sprinkle runs off; a slow, steady pour lets the water absorb through each section.
- Morning watering is ideal — it prevents fungal issues by allowing leaves to dry throughout the day.
Feeding
- Add liquid seaweed feed or a balanced liquid fertiliser every 2–3 weeks throughout the growing season.
- Top-dress with a small handful of slow-release granule fertiliser each spring if the garden overwinters.
- Mediterranean herbs (rosemary, thyme, sage) actively prefer lean soil — don’t over-fertilise these or they’ll put on soft, flavourless growth.
Harvesting
- Harvest little and often rather than cutting large amounts at once. Regular harvesting encourages bushier, more productive plants.
- Always cut just above a leaf node or pair of leaves — this is where new growth emerges.
- Never harvest more than one-third of any plant at once. This keeps the plant strong and productive.
- Pinch out flower buds on basil as soon as they appear — once basil flowers, the leaves turn bitter and the plant declines.
Seasonal Maintenance
- At the end of summer, pot up perennial herbs (rosemary, thyme, chives) and bring indoors before the first frost if you’re in a cold climate.
- Replenish the compost each spring with a top-dress of fresh potting mix. The original compost settles and depletes nutrients over winter.
- Replace annual herbs (basil, coriander) each season from fresh seed or seedlings.
Frequently Asked Questions
What does the HT stamp on a pallet mean, and why does it matter? HT stands for Heat Treated, meaning the wood was sterilised using high temperature rather than chemical fumigation. It’s the only type of pallet you should use for a food-growing project. Pallets marked MB (Methyl Bromide) were treated with a toxic pesticide that can leach into soil and be absorbed by edible plants. Always check the IPPC stamp on the side of the pallet before you start — it takes five seconds and could save you from growing herbs in contaminated soil.
How do I stop the soil from falling out of a vertical pallet garden? The landscape fabric liner is the key. When stapled tightly across the entire back and all four sides of the pallet, it creates sealed fabric pockets between each slat. Fill these pockets densely with potting compost, tamping it down firmly as you go. If you also allow the pallet to lie flat for 2–3 weeks after planting before standing it upright, roots will grip the soil and dramatically reduce any settling or shifting.
Which herbs grow best together in a pallet garden? Group herbs by their water requirements rather than just culinary use. Mediterranean herbs like rosemary, thyme, oregano, and sage prefer drier conditions and do well together. Moisture-loving herbs like basil, parsley, and chives prefer regular watering. Mint is best kept in its own section regardless — it spreads aggressively and will crowd other plants if given the chance. Pairing herbs with similar needs makes watering simpler and plants healthier.
How do I waterproof my herb garden labels? The most durable method is to write or paint your herb names onto a painted wooden surface and then apply two coats of clear outdoor varnish or exterior Mod Podge over the top. Water-based varnish dries fast and is non-toxic once cured. Avoid regular clear nail varnish — it yellows and peels within a season. Chalkboard labels are decorative but require rewriting and re-sealing regularly, making them better suited to sheltered positions.
How much sun does a pallet herb garden need? Most culinary herbs need at least 6 hours of direct sunlight per day. If you can only offer 3–4 hours, choose shade-tolerant herbs like mint, parsley, chives, and coriander — these cope well with partial shade. Avoid trying to grow basil, rosemary, or thyme in a low-light position; they’ll become leggy and tasteless. A south- or west-facing wall or fence is ideal for a vertical pallet installation.
Can I build a pallet herb garden on a balcony? Absolutely — a pallet herb garden is one of the best balcony garden solutions available. Use the flat configuration for weight distribution, or lean it at an angle against the railing for a vertical display. Check your balcony’s weight rating before you begin (a soil-filled pallet can weigh 80–120 lbs / 35–55 kg), and always use a drip tray or saucer beneath a flat pallet to catch runoff and protect the building below.
How do I keep my herbs producing all season long? The key is regular harvesting combined with consistent feeding. Harvest frequently — cutting back to a leaf node every week or two encourages branching and new growth. Feed with a liquid fertiliser every two to three weeks. Remove flower heads promptly on basil and parsley; once these plants flower (bolt), they prioritise seed production over leaf growth and the harvest quality drops. With these three habits — harvest, feed, deadhead — most herbs will produce abundantly from early summer through to the first frost.
What’s the best way to label herbs that look similar, like thyme and oregano? Make your labels prominent and position them at the front edge of each section where they’re easy to read without bending down. If you’re still finding it hard to tell plants apart during the growing season, use a small colour-coded dot on the label (a dab of different paint on the corner of each stake) to make each herb instantly visually distinctive. Over time, you’ll recognise each herb by its scent, texture, and leaf shape — but clear labels are always the most reliable backup.
A pallet herb garden with labeled sections is one of those projects that gives back far more than you put in. A few hours of work, a handful of seedlings, and a free pallet turn into months of fresh flavour, a beautiful outdoor feature, and the quiet satisfaction of growing your own food — even in the smallest outdoor space.
We’d love to see your herb garden! Share your finished pallet setup on Instagram using #NailItHomeMade and tag us @NailItHomeCom. Whether it’s your first herb garden or your tenth, your creation might be the inspiration someone else needs to get started.