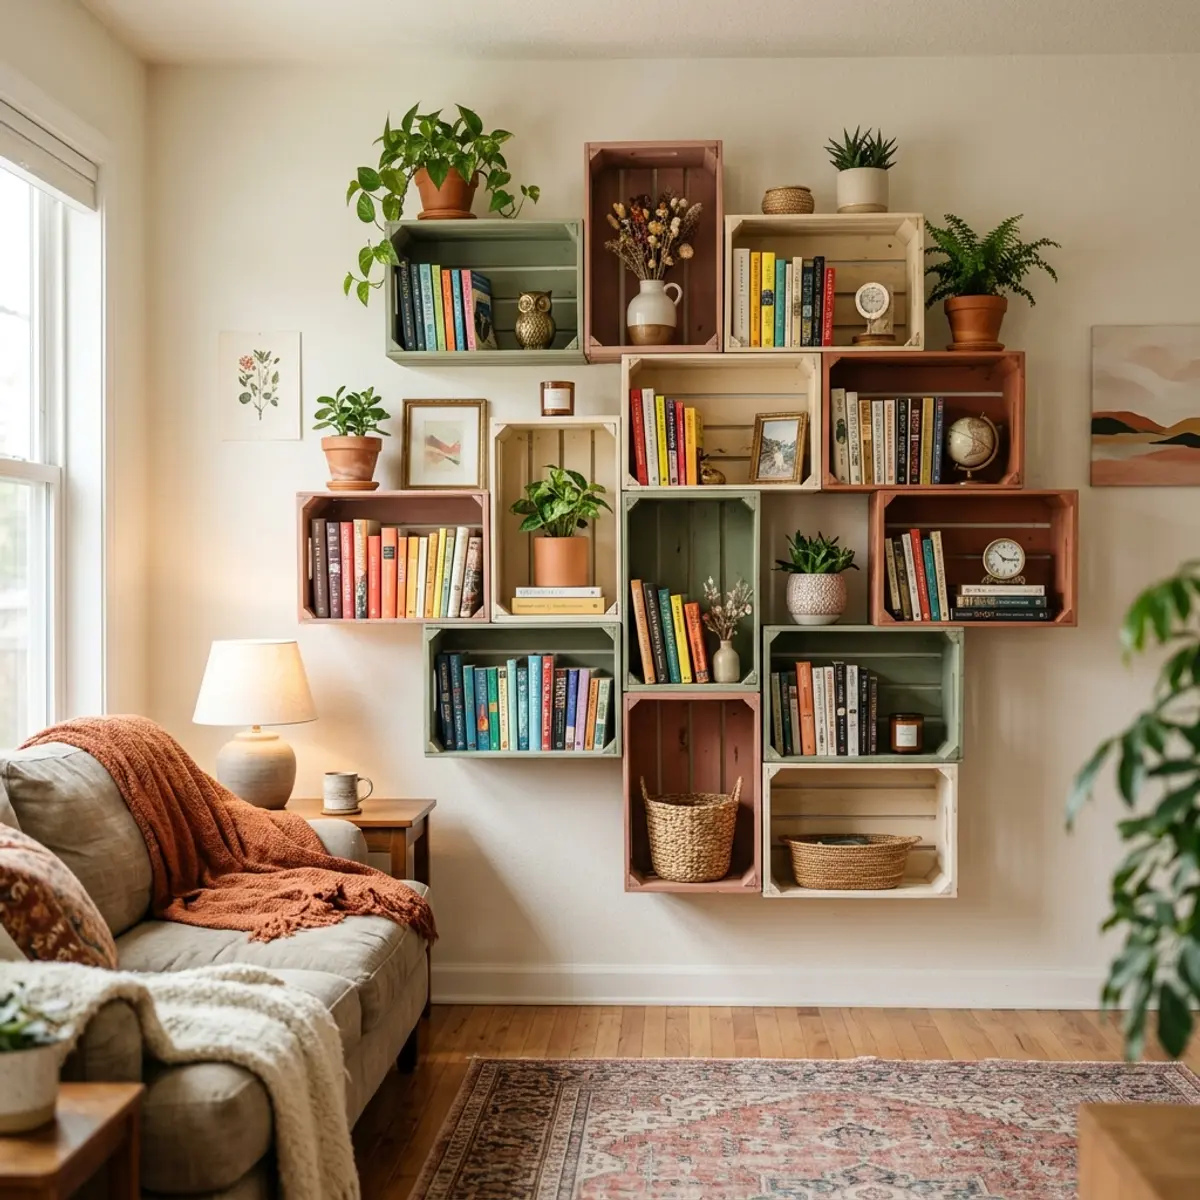
Crate Bookshelf Painted and Stacked Creatively
Nail It Home Editorial
Walk into any home décor shop and you’ll find “rustic crate shelving” selling for hundreds of dollars. Here’s the secret: those same shelves cost about $30 to make yourself — and yours will be more personal, more creative, and more satisfying.
Painted and stacked wooden crates are one of the most versatile DIY storage solutions you can build. They require no special tools, no advanced skills, and almost no budget. Whether you want a floor-to-ceiling reading nook, a kids’ toy display, or a bedroom accent wall full of cubbies, crate bookshelves adapt to any room and any style.
In this guide, you’ll learn exactly how to select, prep, paint, and stack crates into a bookshelf that looks like it belongs in an interior design magazine — for a fraction of the price.
Why Crate Bookshelves Are Such a Great DIY Project
Before you reach for a paintbrush, here’s why this project has earned its place as a perennial DIY favourite:
- Totally modular: Add one crate or a dozen. Expand the shelf as your book collection grows — no rebuild needed.
- Budget-friendly from the start: Unfinished wooden crates cost $10–20 each at craft stores. A few cans of chalk paint and you’re done.
- No power tools required: A paintbrush, sandpaper, and a drill for optional wall anchoring are all you need.
- Infinitely customisable: Mix paint colors, leave some crates natural, go vertical or horizontal — the design is entirely yours.
- Great for renters: Freestanding stacked configurations mean no permanent wall damage.
- Fast results: A weekend project from first brush stroke to styled shelves.
What You’ll Need — Supplies and Tools
Gather everything before you begin. Having it all on hand means you won’t lose momentum between steps.
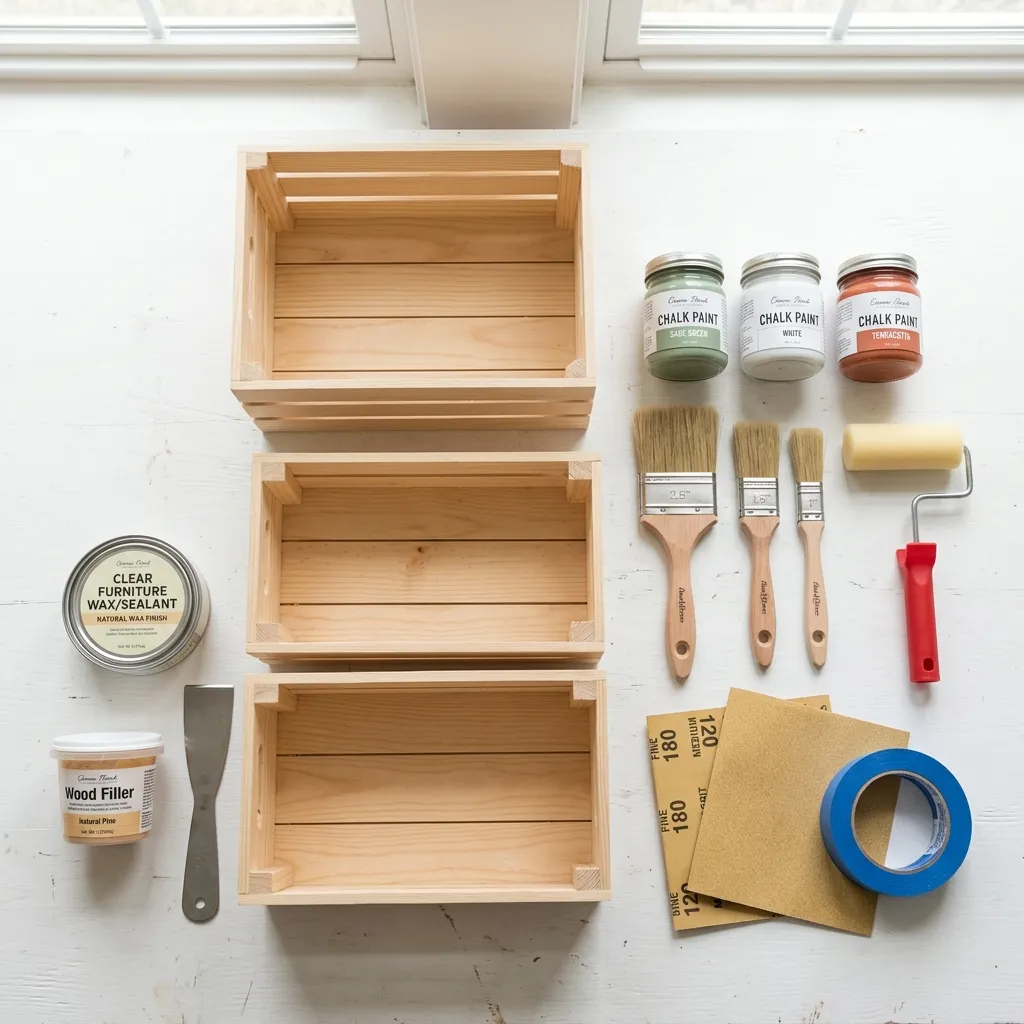
Wooden Crates
- Unfinished wooden crates from craft stores (Michaels, Hobby Lobby, IKEA KNAGGLIG, or similar). Aim for crates that are uniform in size so they stack evenly.
- Quantity: 3–6 for a small display; 8–12 for a large floor-to-ceiling installation.
- Check for: Sturdy construction, no major splits or warping, and flat bottom edges so they sit level.
Paint and Prep Supplies
- Chalk paint or acrylic craft paint: Chalk paint is ideal — it adheres to raw wood without primer, gives a beautiful matte finish, and is beginner-friendly. One 8 oz jar covers 1–2 crates.
- Paint primer (optional): Only needed if you’re using regular latex paint instead of chalk paint.
- Sandpaper: 120-grit and 220-grit
- Tack cloth or damp rag
- Painter’s tape
- Paintbrushes: A 2-inch flat brush for flat surfaces, a small detail brush for corners
- Small foam roller (optional): Gives an ultra-smooth finish on large flat sides
Finishing and Assembly
- Clear paste wax or matte sealant spray: Protects the painted finish from scuffs and moisture
- Wood glue or L-brackets: For securing stacked crates to each other (strongly recommended)
- Drill + screws or furniture straps: For anchoring the stack to the wall (important for tall configurations or households with children)
- Felt pads: For the bottom crates to protect your floor
Estimated total cost: $30–60 depending on the number of crates and whether you already own paint and tools.
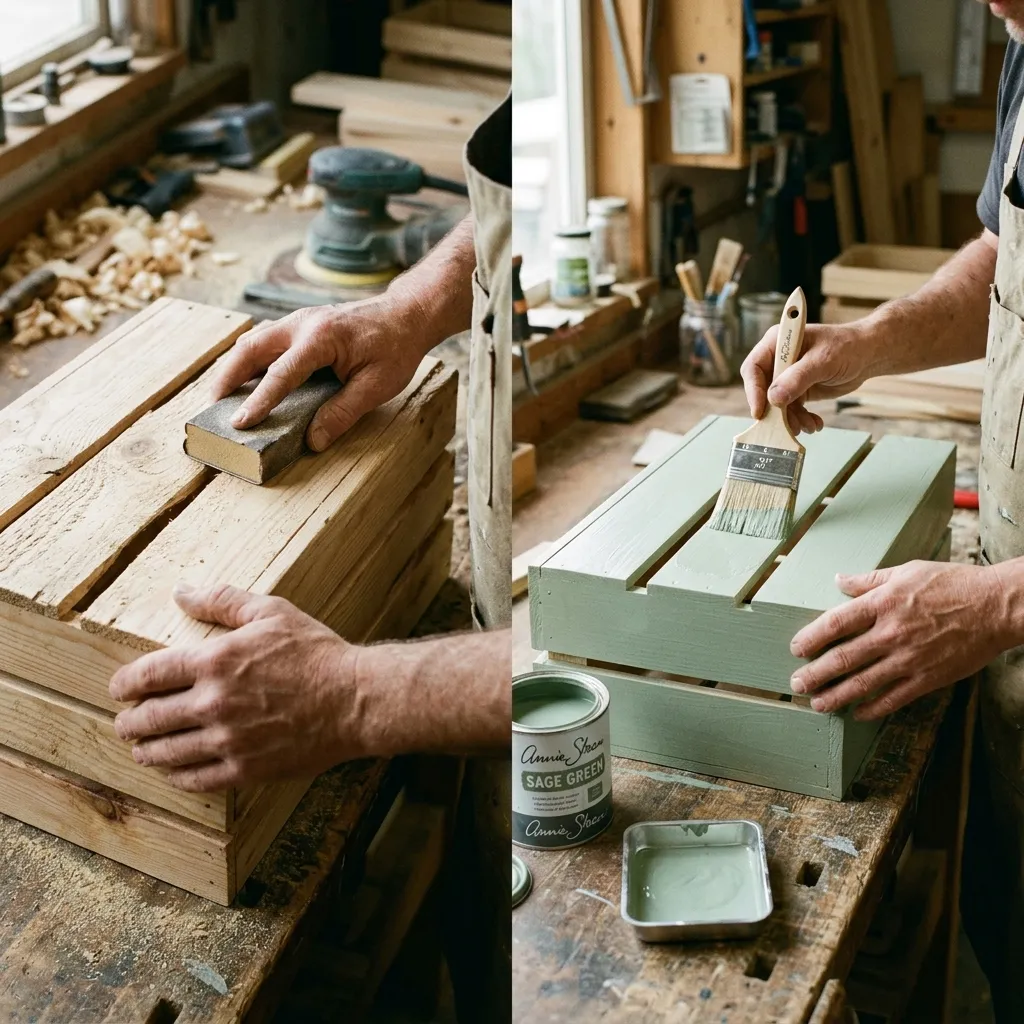
Step 1 — Sand and Prep Your Crates
Raw wooden crates from craft stores can be surprisingly rough. A little prep work now means a far better paint finish and a shelf that looks polished rather than patchy.
- Inspect each crate. Check for protruding staples or sharp edges. Use pliers to pull out any staples and tap any raised nail heads flush with a hammer.
- Sand with 120-grit sandpaper. Focus on the inside corners, the slat surfaces, and the top edges. You’re smoothing out rough grain and splinters, not stripping the wood.
- Finish with 220-grit sandpaper for a silky surface that takes paint evenly.
- Wipe down with a tack cloth. Remove all dust completely — even fine sawdust will show up as bumps under chalk paint.
- Apply painter’s tape if you’re planning two-tone or colour-blocked designs (e.g., painting the inside of the crate one colour and the outside another).
Tip: Sand in the direction of the wood grain to avoid cross-grain scratches that show up under paint. A few minutes of careful sanding pays dividends in the finished result.
Step 2 — Paint Your Crates
This is the most satisfying part. Choose your color palette before you start painting — a cohesive scheme is what elevates a crate shelf from craft project to intentional interior design.
Color Palette Ideas
- Earthy neutrals: Cream, warm white, oat, and sand — works with every style, especially Scandinavian and farmhouse.
- Bold accent pair: One neutral plus one statement color (sage green, terracotta, or dusty blue) for every third crate.
- Monochrome tones: All white or all charcoal for a graphic, modern look.
- Rainbow gradient: Fun for kids’ rooms — paint each crate a different color and arrange them in spectrum order.
How to Apply Chalk Paint
- Stir your chalk paint thoroughly — the pigment settles quickly.
- Apply the first coat in long, even strokes following the direction of the wood slats. Don’t overload the brush. A thin coat is better than a thick, gloopy one.
- Let it dry completely — chalk paint typically dries in 20–30 minutes, though humidity affects this.
- Lightly sand the surface with 220-grit between coats. This step is optional but gives a noticeably smoother result.
- Apply the second coat. Two coats give full, even coverage. A third coat is only needed for very dark woods or if you’re applying a light color over a previously stained surface.
- Seal with clear paste wax or matte spray sealant. Chalk paint without sealant scratches and chips easily. Wax buffed in with a lint-free cloth gives a beautiful soft sheen; spray sealant is faster and equally effective.
Pro tip: If you want a slightly distressed, vintage look, let the second coat dry fully, then very lightly sand the top edges and corners with 220-grit. The raw wood showing through looks intentional and charming.
Step 3 — Plan Your Stacking Configuration
How you stack your crates is where the real creativity happens. There’s no single right answer — just a few principles that separate a beautiful result from a wobbly one.
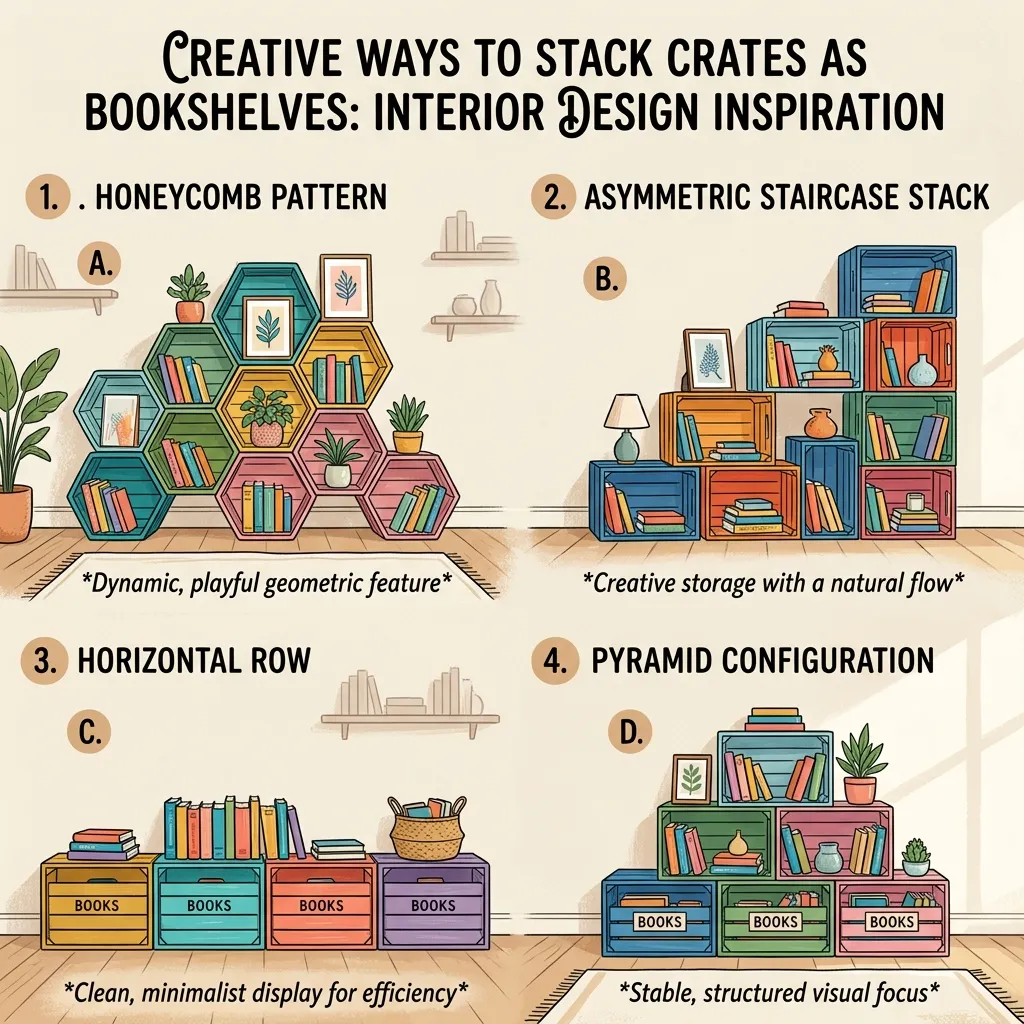
Popular Stacking Configurations
The Grid Stack The most straightforward approach: crates stacked in neat rows and columns, all facing the same direction. Clean, structured, and great for a study or home office.
The Honeycomb / Staggered Stack Alternate crate orientation (some facing forward, some sideways) and stagger the rows so joints don’t align. Creates an organic, dynamic look. Works beautifully as a living room feature wall.
The Asymmetric Tower Combine crates of different orientations — some horizontal, some vertical, some turned on their side — to create a deliberately irregular silhouette. This works especially well in a corner.
The Staircase Configuration Stack crates in a descending staircase along a wall. Excellent for bedrooms and offices where you want a piece that draws the eye along the wall rather than up it.
Orientation Options
Each crate can be used in three ways:
- Opening facing forward — standard bookshelf cubby for books, baskets, and plants
- Opening facing up — deep bin for magazines, rolled blankets, or toy storage
- Turned sideways (on its side) — creates a long horizontal shelf ideal for folded items or a row of small objects
Mix these orientations within your stack to create depth and visual interest.
Step 4 — Assemble and Secure Your Stack
A beautiful stack that tips over is a safety hazard and a heartbreak. Take 15 extra minutes to secure your crates properly.
Securing Crates to Each Other
- Wood glue: Apply a thin bead of wood glue along the top edge of the lower crate before setting the next one on top. Let it cure overnight before loading the shelves.
- L-brackets: For extra rigidity, add small L-brackets (from the hardware store) at the back of each joint where two crates meet. These are invisible from the front but make the whole structure dramatically more stable.
- Screws through the bottom: For side-by-side crates at the same level, drill a single screw through the side of one crate into the side of the adjacent crate at the midpoint. Pre-drill the hole to avoid splitting the wood.
Anchoring the Stack to the Wall
Any shelf taller than two crates should be anchored to the wall — especially if you have children or pets.
- Furniture anti-tip strap: The easiest solution. One strap attached near the top of the stack and anchored into a wall stud keeps the whole unit from tipping forward.
- L-bracket at the top: Mount a single L-bracket behind the top crate and screw it into a stud. This is invisible and extremely secure.
- Floating a single-column stack: For a vertical tower of stacked crates, mount a vertical batten (a 1×2 strip of wood) to the wall and screw the back of each crate to the batten. The crates appear to float off the wall.
Safety note: A stack of 6 or more crates can be surprisingly heavy once loaded with books. Always anchor into a wall stud — not just drywall — for any installation taller than three crates.
Step 5 — Style and Fill Your Crate Bookshelf
The way you fill your crate shelf is what turns a storage solution into a design statement. The key is intentional curation — not everything that fits should go in.
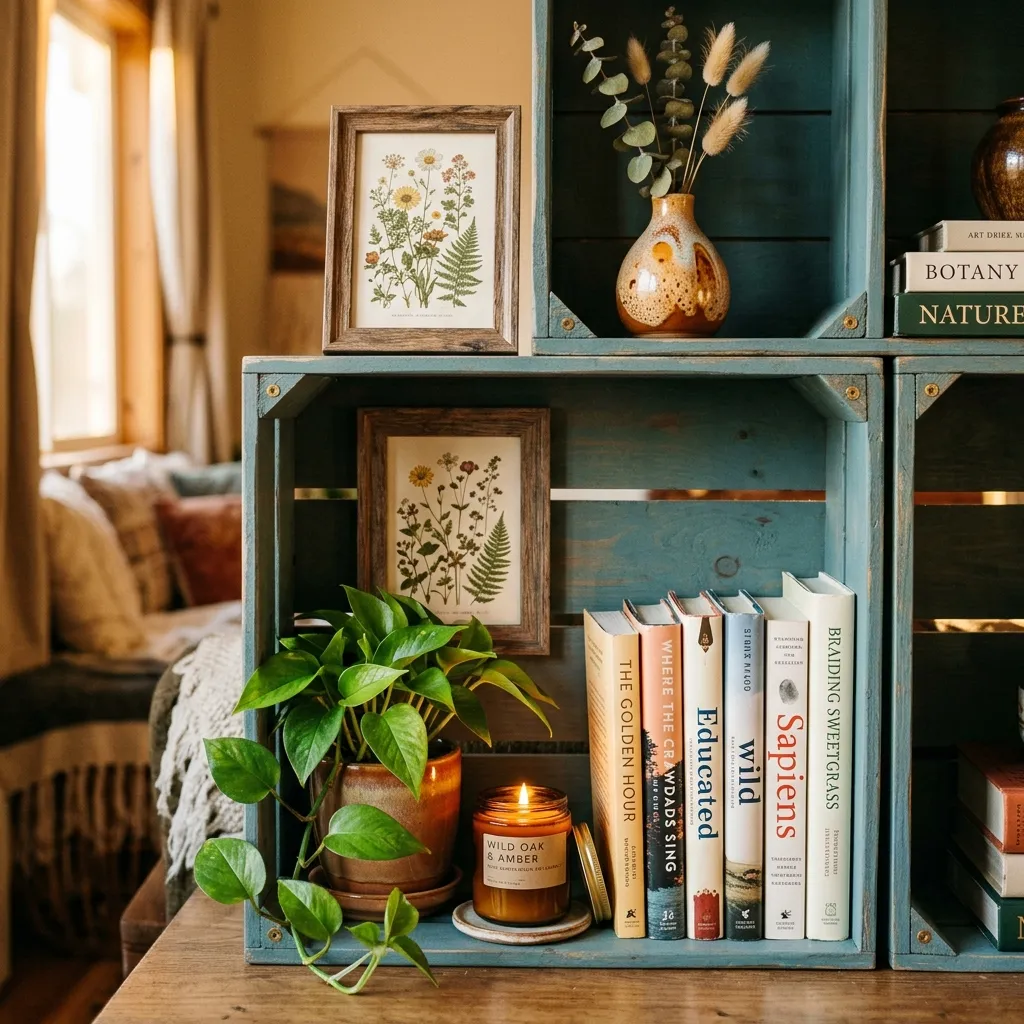
The Rule of Three
Style each cubby with three elements: something vertical (a tall book or a small plant), something horizontal (a small stack of books or a flat decorative object), and something with texture or color contrast (a small ceramic, a candle, a woven basket). This instantly makes each section look considered.
What Works Well in Each Cubby
- Books: Group by color or spine direction. A cluster of books with covers facing out creates a gallery wall effect.
- Trailing plants: Pothos and ivy spill beautifully over crate edges. A small pot tucked into the upper corner softens the whole structure.
- Baskets and bins: Tuck one basket per row for items you want hidden — remotes, chargers, stationery.
- Framed art: Small prints or photos leaned against the back wall of a crate add personality without the commitment of hanging.
- Candles and diffusers: A candle or reed diffuser adds scent to the room and looks styled without effort.
- Memorabilia: Trophies, small sculptures, or meaningful objects look intentional in a defined cubby space rather than scattered on a table.
Balance the Visual Weight
Stand back every time you add or rearrange items. You’re looking for balance across the shelf — not symmetry, but balance. Spread your tallest items, brightest colors, and largest objects so no single corner dominates.
Inspiration: Crate Bookshelves in Every Room
The beauty of painted crate bookshelves is that they adapt to any room’s needs and aesthetic.
Living room: A wide, low configuration (three crates across, two high) acts as a media console alternative. Stack the bottom row with bins for gaming equipment and blankets; fill the upper row with books and plants.
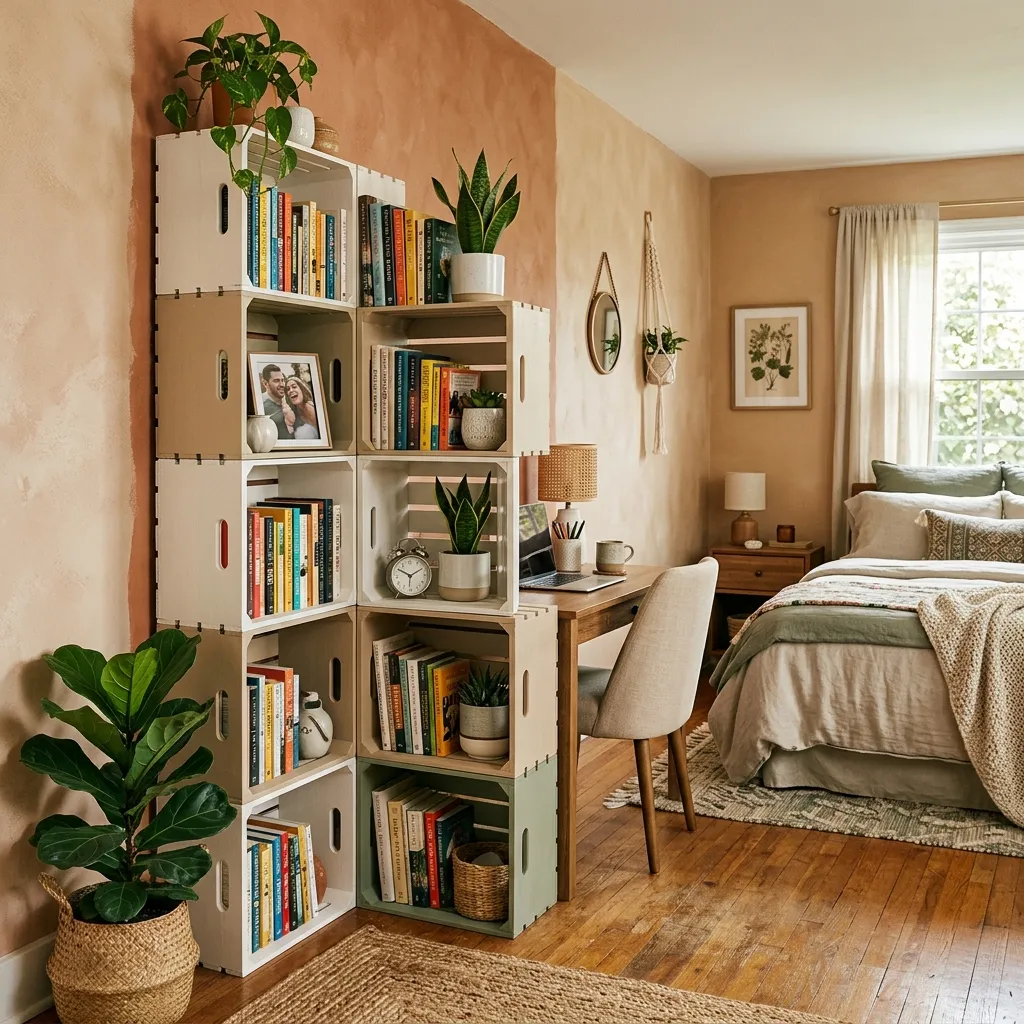
Bedroom: A floor-to-ceiling vertical stack in the corner creates a reading nook beside the bed. Light it with a small clip-on reading lamp tucked into one of the upper crates.
Kids’ room: Paint each crate a different colour and use them at floor height so children can easily access their own books and toys. Label each crate with their name or a category using a chalk paint marker.
Home office: A compact 2×3 grid behind your desk organises books, files, and supplies while adding visual depth to video calls.
Hallway or entryway: A single column of three crates turned opening-up creates instant entryway storage — one for shoes, one for bags, one for seasonal accessories.
Money-Saving Tips
You don’t need to spend much to make this project look expensive. Here’s how to stretch your budget:
- Check Facebook Marketplace and Craigslist for used wooden crates — often free or under $5 each, especially after farmers’ markets or wine tastings.
- Buy paint sample pots instead of full-size jars. A $4 sample pot of chalk paint covers two crates easily.
- Use leftover paint from other projects. Mismatched paint colors create an eclectic, intentional look when styled well.
- Skip the furniture store sealant and use a budget $5 spray sealant from a hardware store — same protection, fraction of the cost.
- Reuse wine crates or produce crates from local markets. They’re usually free, already weathered beautifully, and loaded with character.
- Buy L-brackets in bulk packs — they’re far cheaper per unit than buying them individually.
Frequently Asked Questions
What type of paint works best on wooden crates? Chalk paint is the top recommendation for crates. It adheres directly to raw, unprimed wood with excellent coverage and dries to a beautiful matte finish. It’s also very forgiving — any drips or brush marks can be lightly sanded once dry. If you prefer a shinier finish, acrylic latex paint over a shellac-based primer gives a durable, smooth result, particularly good for crates that will see heavy daily use.
Do I need to seal the painted crates? Yes — sealing is essential, especially for chalk paint. Without a protective topcoat, chalk paint scratches and scuffs very easily. Clear paste wax is the classic chalk paint finish: apply a thin coat with a lint-free cloth, let it haze, then buff to a soft sheen. Alternatively, a matte polyurethane spray gives excellent durability with less effort.
How many crates do I need for a full bookshelf? For a compact nightstand-style shelf (2 crates wide, 2 high), you need 4 crates. For a medium living room unit (3×3), you need 9. For a floor-to-ceiling installation in a room with 8-foot ceilings, plan for 3–4 crates per vertical column. Most standard wooden craft crates measure 12×12×9 inches, so 4 stacked crates reach roughly 36–40 inches (a standard countertop height).
How do I make the stack safe and prevent it from tipping? For any stack taller than two crates, secure the crates to each other with wood glue and L-brackets, and anchor the top of the stack to the wall using a furniture anti-tip strap or a wall-mounted L-bracket screwed into a stud. This is especially important in households with children or pets. A single properly placed wall anchor makes the structure essentially immovable.
Can I mix different sizes of crates? Yes, and it often looks better than using identical sizes. Mixing a few large crates (for books and plants) with smaller accent crates (for candles and small objects) creates a more dynamic, architect-designed silhouette. The key is keeping one dimension consistent — if you mix widths, keep heights the same, and vice versa — so the overall form reads as intentional rather than mismatched.
What’s the best way to arrange books on crate shelves? Books look best when grouped with intention. Some ideas that always work: arrange by spine color for a rainbow effect; group by height so each cubby has a consistent visual weight; face a few covers outward to break the monotony of spines; and alternate a vertical stack with a horizontal stack within the same cubby for visual rhythm. Avoid cramming every book in spine-out — a little breathing room makes the whole shelf look better styled.
Can I use crate bookshelves outdoors? With the right preparation, yes. Use an outdoor-grade primer, exterior chalk paint or exterior latex paint, and finish with a UV-resistant exterior sealant. Raw pine crates aren’t naturally weather-resistant, so the protective finish is critical. A covered porch or pergola is ideal — direct rain will eventually work through even a well-sealed finish over time.
How do I level a crate stack on an uneven floor? Adjust each crate’s position at the bottom using small furniture shims (available from hardware stores, or make your own from thin scraps of wood). Once the base crates are level, the rest of the stack will follow. Stick felt pads under the shims to keep everything in place and protect your floor.
Building a painted crate bookshelf is one of those rare DIY projects that genuinely costs less, looks better, and feels more personal than anything you’ll find in a shop. A few hours of sanding and painting, a thoughtful arrangement, and a little styling — and you have a storage piece that anchors an entire room.
We’d love to see your creation! Share your painted crate bookshelf on Instagram using #NailItHomeMade and tag us @NailItHomeCom. Every stack is different, and yours might just inspire someone else’s weekend project.